Mobile
This chapter covers various mobile technologies including Web, J2ME, SMS Service and SMS Command.
DHIS2 Mobile Introduction
DHIS2 provides a range of options to allow data entry from mobile devices, including a dedicated GPRS/3G J2ME client and two versions of DHIS2 which have been optimized specifically for mobile browsers. Each of these solutions will be described in detail in the following sections. DHIS2 offers several Android clients, which are described in detail in other sections of this guide.
Collection of data in the field can be technically challenging and expensive. Mobile phone solutions have the potential to significantly reduce the complexity of deploying a distributed data collection system. Using a simple Java client installed on a mobile phone or a web browser which works on the mobile phone, field workers can report directly to the DHIS2 database through their mobile device.
While mobile phone solutions have a great potential, there are complexities with such deployments. Phones lack processing power and have a small display, they need to be charged, and often such deployments make the most sense in areas with poor or intermittent network coverage.
Each of the mobile solutions are introduced briefly below, and the discussed in separate sections in detail:
-
DHIS2 Light: A mobile browser optimized data entry module for all devices
This module allows for data entry directly with the browser of the mobile device. A wide range of devices and mobile browsers are supported including: Opera mini 3 & 4 (basic and advanced) - Opera mini 4, Nokia S40 mobiles ,Windows Phone 7, Window Mobile 6, Palm Pre, Blackberry (v5 and v6), Firefox mobile, iOS devices (iPhone) and Android devices. This client does not have offline-support, and an active GPRS/3G connection is required. It does not require a new application installation on the phone to support new features, but does require a stable data connection for use. This solution is described in Mobile browser based data entry
-
DHIS2 Smartphone client: A mobile browser optimized data entry module for Smartphone devices
This module allows for data entry directly with the browser of a Smartphone. Offline data entry is supported and it does not require any installation of a special client on the phone itself.
-
J2ME GPRS/3G client
DHIS-mobile includes two separate J2ME clients supporting GPRS/EDGE/3G as a transport mechanism. One clients supports facility aggregate reporting and the second client supports name-based program tracking. These clients are split into separate applications to make deployment easier. Some health workers may have both applications installed on their phone. Both of these clients support offline-storage of data and work on J2ME enabled devices (feature phones). .?>
An active GPRS/3G connection is required in order to send data to the DHIS2 database, but data can be entered offline and transmitted when a connection is present. This client is intended primarily for low-end devices which support J2ME applications, although the offline-supports adds some memory requirements which limits the handset selection. While the solution is primarily tested on Nokia phones, it also works on several other J2ME capable handsets.
The facility reporting J2ME client is described in the chapter "J2ME GPRS/3G Client"
Mobile browser based data entry
Getting started with mobile browser data entry
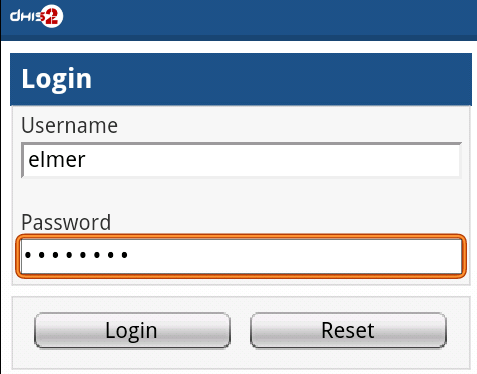
This approach is for data-entry on a smart phone with a mobile browser by navigating to the URL of the DHIS2 instance, for example: the full URL link for demo on dhis2.org http://apps.dhis2.org/dev/mobile/index.action . And your mobile browser will automatically detect the DHIS2 application where the server URL is given (e.g.: http://apps.dhis2.org/dev). Here is the login form to access the application with user-name and password. Click on "Login" to continue or "Reset" to reset:
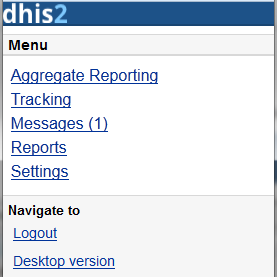
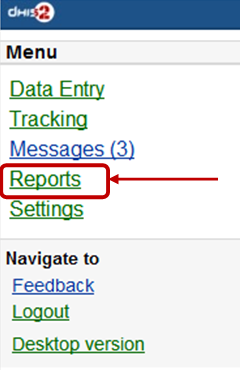
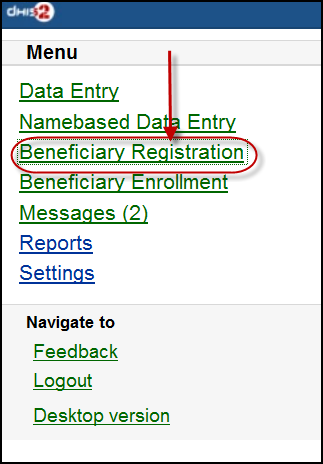
After logging in, there are the list of functions:
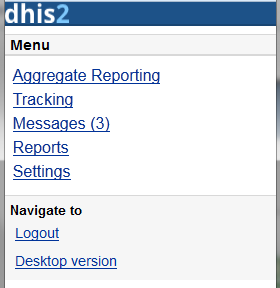
- Aggregate Reporting: Entries for aggregate data with defined/assigned dataset by organisation-units
- Tracking:
-
Find Person: find person based on Name, Phone Number or ID, and Organization unit.
-
Activity Plan: Entries data for the persons by organisation-units, persons and programs/program-stages
-
Person Registration: Registry a new person
-
Anonymous: Entries for anonymous person based on programs
- Messages: Manage the messages and discussions from the server. Message reply is available. User can send feedback message in Messages.
- Reports: The output reports from the server.
- Settings: User-information (e.g.: First-name, Surname, Phone number, E-mail) and the Interface language.
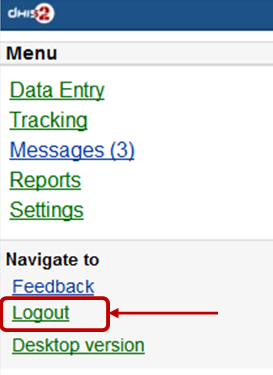
- Logout: to log out the application.
- Desktop version: navigate to the desktop version of DHIS2 for administration. This require a lot of resources from the client mobile, for example: the sufficient memory to load the pages. Not recommended for the normal GPRS/3G/... phones.
The list above will be explained in details:
-
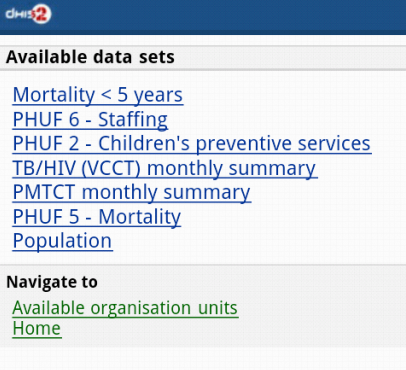
Aggregate Reporting: Entries for aggregate data with defined/assigned dataset by organisation-units.
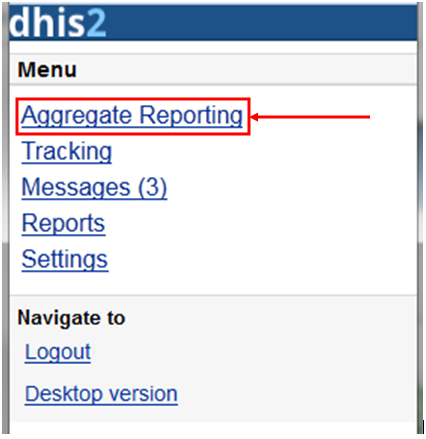
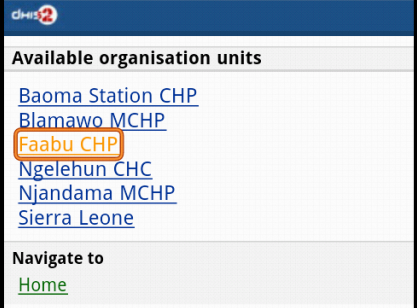
Click on the "Aggregate Reporting", then choose an Organisation Unit from the list and the list of the datasets will be appeared for entering aggregate data. See the below example:
Step 1: Select an Organisation Unit from the list
Step 2: Select a Dataset (entry form) from the list
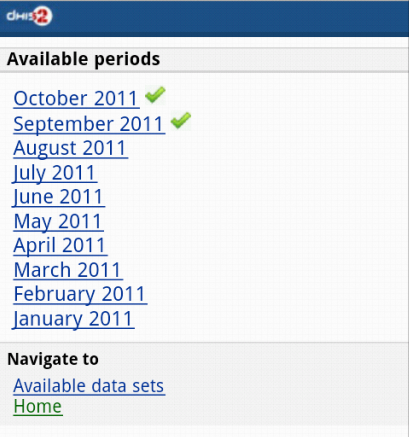
Step 3: Select a period (based on the period type of the chosen dataset) from the list
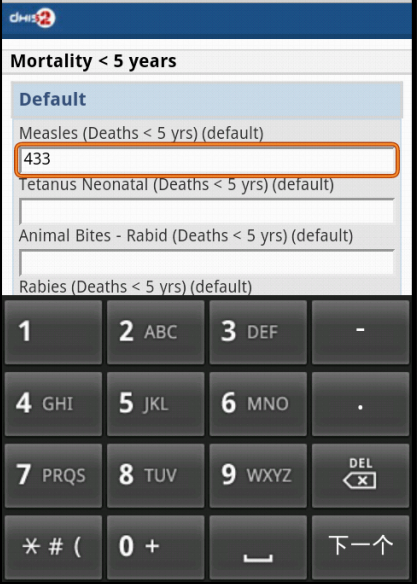
Step 4: Entering the data
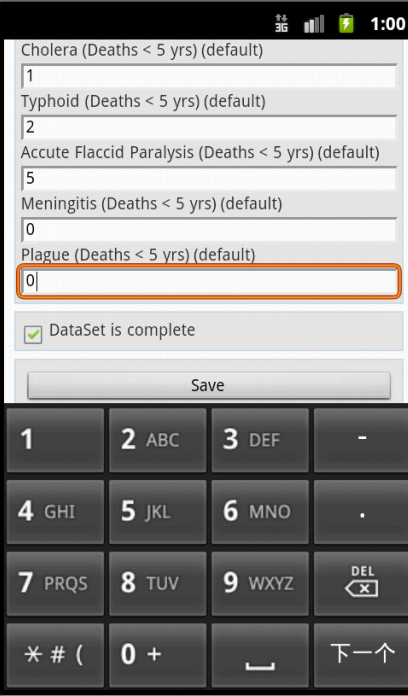
Step 5: Save the data entered after completing the data, choose the option for data completeness if having.
-
Tracking: Find/Add Person, Visit Schedule, Person Registration, Anonymous
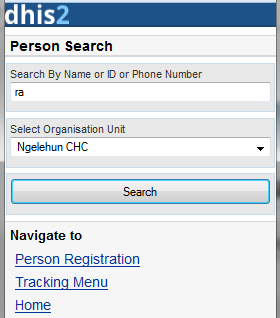
2.1 Find/Add Person: find person based on Name, Phone Number or ID, and Organization unit.
-
Step 1: insert Name, Phone Number or ID and select the Organization Unit, then click Search.
-
Step 2: select a person
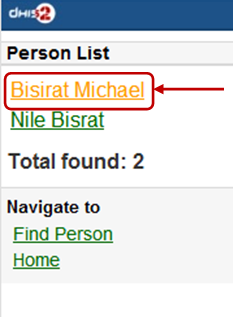
Then all the information of that person will be displayed
-
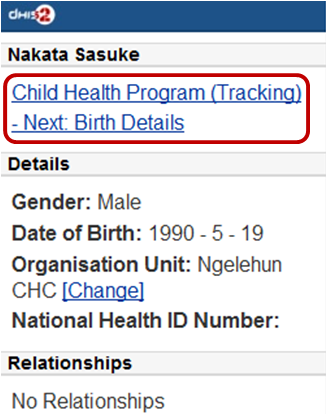
Step 3: choose the next program stage for entering the data
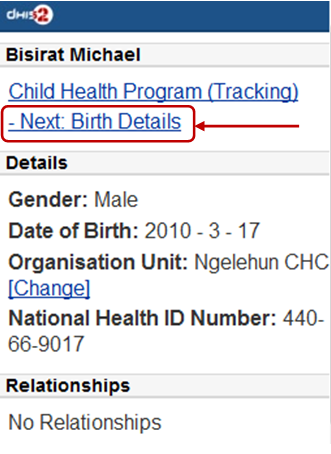
To view all the program stages, click on the name of that program (Child Heath Program as the screen shot)
2.2: Visit Schedule: Choose An Organization Unit

-
Current Activity Plan: the list of the beneficiaries registered, enrolled, not yet finish/complete a/many program and there is at least a program-stage open for data-entry.
+ Step 1: Choose a Person for entry
+ Step 2: Choose a current and active program-stage for entering the data
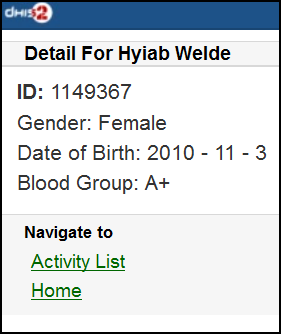
You can also see the person's information (ID, gender, Date of Birth, and Blood Group) by clicking on the Details (on top of the list appeared)
The details information of the chosen person:
-
All Activity Plan: the list of all beneficiaries registered, enrolled, not yet finish/complete a/many program.
-
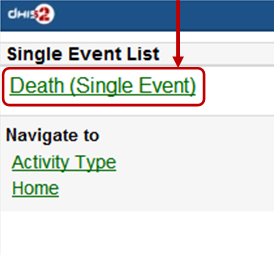
Single Event:
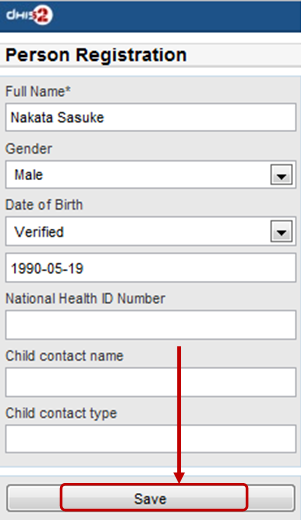
2.3: Person Registration: Registry a new Person
-
Step 1: Entry personal information
-
Step 2: Enrol program for the person just been registered, then click "Enroll".
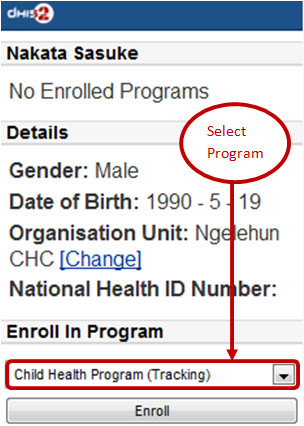
-
Step 3: Entry required information for the chosen program, then click "Enroll"
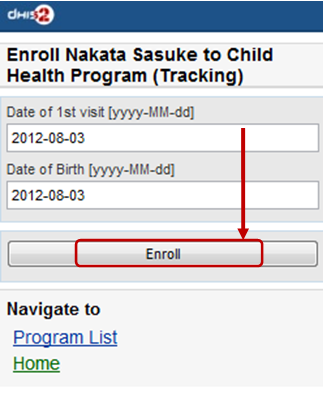
Here is the result:
2.4: Anonymous: Entries for anonymous person based on specific programs

-
-
Messages: Manage the messages and discussions from the server. Message reply is available.
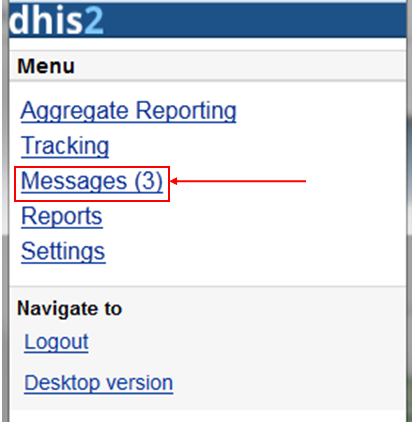
The number showed is the unread messages. Click on that to view the list of the messages (the unread messages are in bold and dark blue color):

Then you can pick up the message/topic for the discussions by leaving the reply message, see this example:
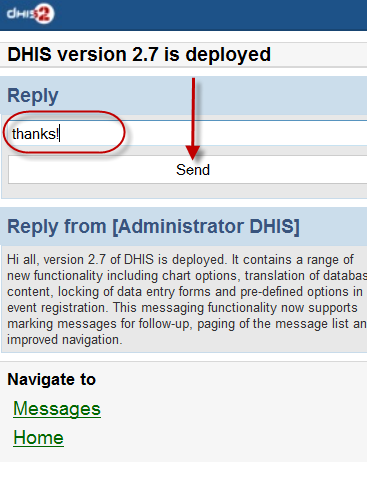
User can create and send a feedback to server in messages section. After sending out the new feedback, the message (feedback) will be listed under "Messages" for further following up.
-
Reports: The output reports from the server
(will be updated)
-
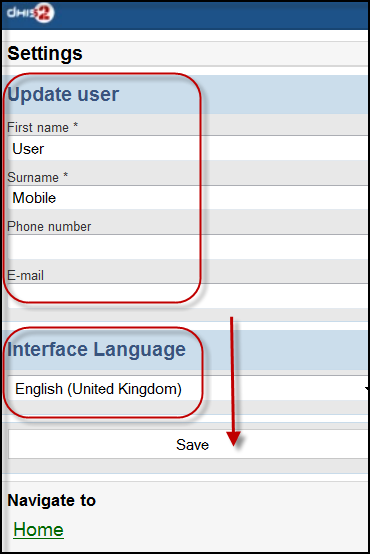
Settings: User-information (e.g.: First-name, Surname, Phone number, E-mail) and the Interface language.
Here is the form for setting the user account/access and the interface language. Click on "SAVE" for completing the settings, see the example below:
-
Logout: to log out the application
-
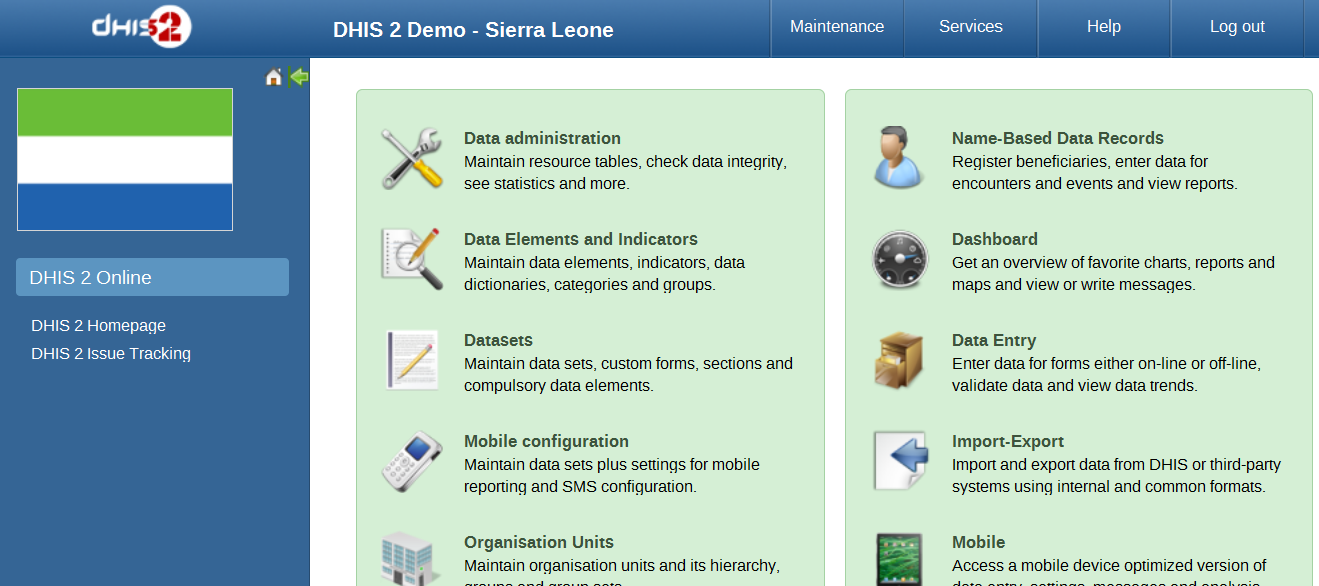
Desktop version: navigate to the desktop version of DHIS2 for administration.
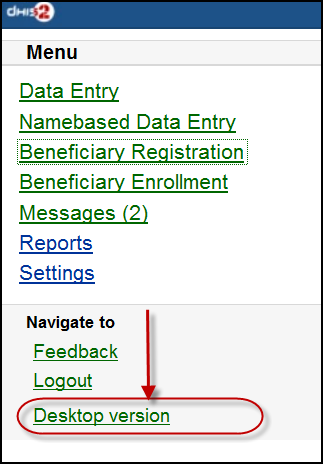
Here is the GUI of the desktop version (which require much memory for loading), not recommended for normal mobile. The example with DHIS2 Demo (from dhis2.org)
-
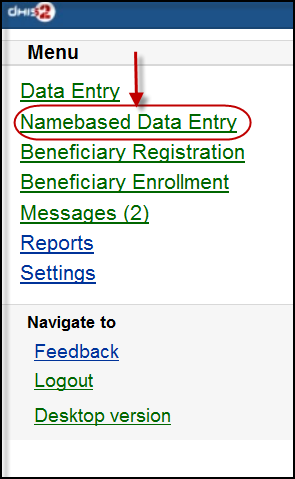
After clicking on the "Namebased Data Entry", the next will guiding to the selections in the following steps:
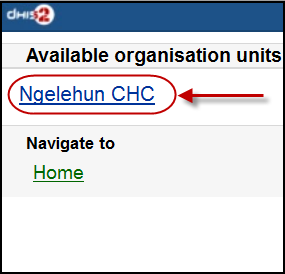
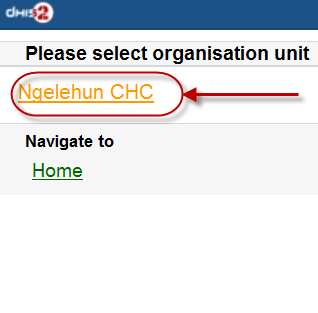
Step 1: Choose an Organisation Unit
Step 2: Choose the Activity Type
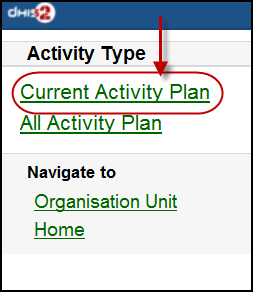
(the screen-shot with an example with "Current Activity Plan" option)
There will be normally these two type of Activity:
+ "Current Activity Plan": the list of the beneficiaries registered, enrolled, not yet finish/complete a/many program and there is at least a program-stage open for data-entry.
+ "All Activity Plan": the list of all beneficiaries registered, enrolled, not yet finish/complete a/many program.
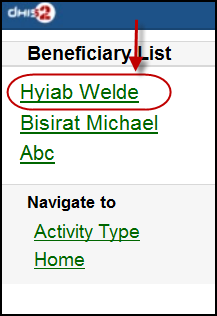
Step 3: Choose a Beneficiary for entry
(the screen-shot with an example with "Hybia Welde" option)
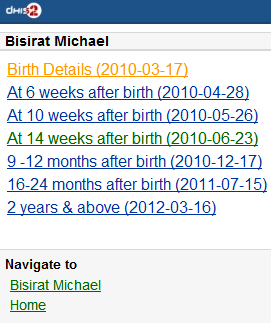
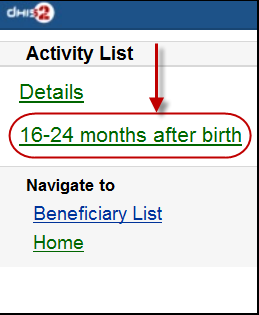
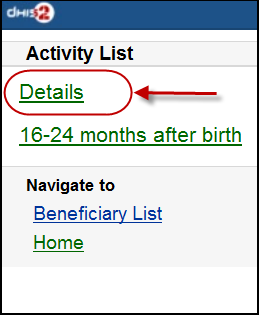
Step 4: Choose a current and active program-stage for entering the data
(the screen-shot with an example with "16-24 months after birth" option)
You can also see the beneficiary's information (ID, gender, Date of Birth, and Blood Group) by clicking on the Details (on top of the list appeared)
The details information of the chosen beneficiary:
-
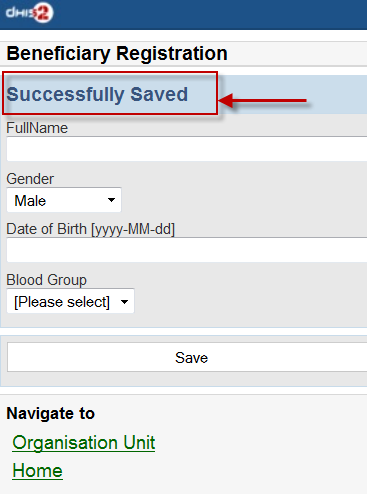
Beneficiary Registration: Registry a new beneficiary
Step 1: Choose an OrganisationUnit
Step 2: Fill in the Beneficiary Registration form
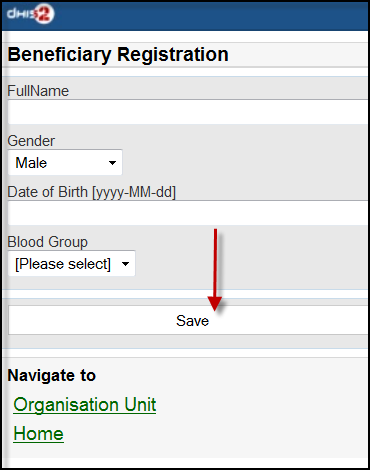
There necessary information: Full Name, Gender, Date of Birth (and Blood Group).
Click on "SAVE" to register a new beneficiary.
A message "Successfully Saved" will appear when the beneficiary is created/registered successfully.
-
Beneficiary Enrollment: Enrol a beneficiary to one or many programs
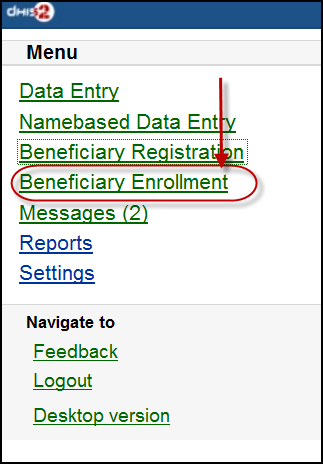
Before enrolling a beneficiary to a program, the search function for a beneficiary is provided:
If the beneficiary is found, the result will be listed. The simply click on the beneficiary name for navigating to the programs in which the beneficiary enrolled:
The below screen-shot example describes the beneficiary named "Nguyen Van A":
- Has not enrolled any programs before
- There is one program: "Child Health Program" available for enrolment
The list of the available programs for enrolment will be listed. Just click on the program for enrolment by specifying the date of enrolment and the date of incident. See the example:
After clicking on the "ENROLL" button, if successful, the program enrolled will be listed under "Enrolled Programs for" + <Name of the beneficiary>, see the example:
-
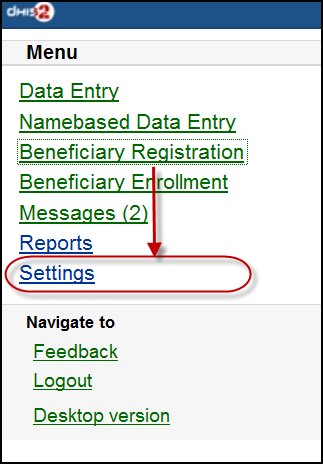
Messages: Manage the messages and discussions from the server. Message reply is available.
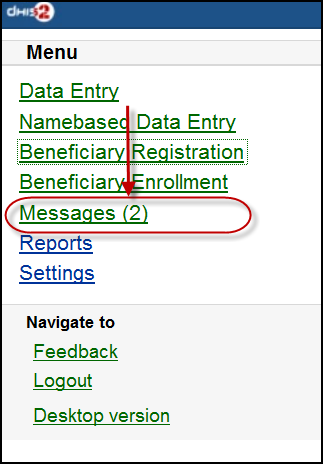
The number showed is the unread messages. Click on that to view the list of the messages (the unread messages are in bold and dark blue color):

Then you can pick up the message/topic for the discussions by leaving the reply message, see this example:
-
Reports: The output reports from the server
(will be updated)
-
Settings: User-information (e.g.: First-name, Surname, Phone number, E-mail) and the Interface language.
Here is the form for setting the user account/access and the interface language. Click on "SAVE" for completing the settings, see the example below:
-
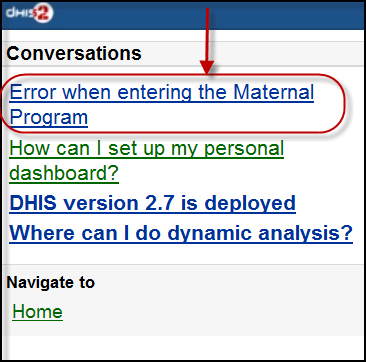
Feedback: the extra function for creating a new message to send to the server. The new created feedback from this will be listed under "Messages"
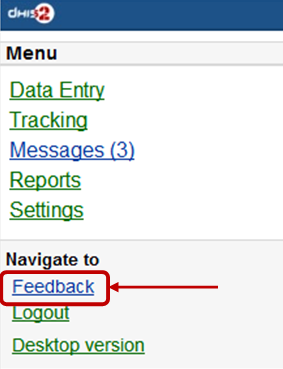
After clicking on the "Feedback", there will be a form for editing/sending out a new message/discussion. See the example below:
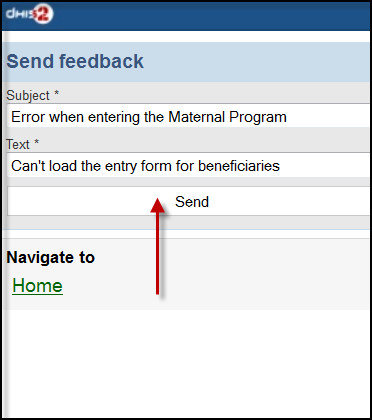
After sending out the new feedback, the message (feedback) will be listed under "Messages" for further following up.
-
Logout: to log out the application
-
Desktop version: navigate to the desktop version of DHIS2 for administration.
Here is the GUI of the desktop version (which require much memory for loading), not recommended for normal mobile. The example with DHIS2 Demo (from dhis2.org)
J2ME GPRS/3G Client
The DHIS2 GPRS/3G mobile module provides a mechanism for remote clients using mobile phones to enter data directly into the DHIS2 system. There are two functions of the client, namely:
The solution relies on the mobile phone having a data connection available (i.e. GPRS, Edge, 3G), over which it communicates with a DHIS2 instance which must be publicly available on the internet, as any other web server. The client application on the phone downloads the data entry forms to the phone from the server, and the forms can therefore be updated without installing a new application. This is also a crucial feature for community reporting, which relies on regularly downloading activity plans from the server.
-
Facility reporting, for data entry and reporting of regular DHIS2 aggregate data,
-
Activity reporting, for supporting individual activity reporting with the Community module.
Data connection availability
Data connection availability can be a problem in many of the contexts where DHIS2 mobile reporting would otherwise be a good solution for getting data directly into DHIS2. If that is the case for you, you might want to consider trying the SMS based solution described in a separate document. Keep in mind that even though a data connection is currently required for communication between the server and the mobile phone, it is only required when initializing or updating the mobile application and when sending reports to the server. The phone stores all entered data locally, so it can work fine with only temporary access to a data connection on a regular basis.
J2ME GPRS 3G facility reporting client
The server side component of the web based solution is included in the general build of DHIS2.
In order to configure the DHIS2 web-based mobile reporting, you should follow the following steps.
-
Set the "Available for Mobile Reporting" flag for the data sets you want reported: Under Maintenance->DataSet->Edit mark the “Available for Mobile Reporting” check box and save.
-
Create a user role for the mobile user. Select Maintenance->Users->User Role->Add new. Add a user role name and description. Add the desired data sets for the role. The mobile user role will need to have at least privileges for DHIS2 Web API. Save the user role by clicking "Save".
-
Create a user which will be used by the client to login from Maintenance->Users->User ->Add new. Fill in all of the required details, keeping in mind that the password must be at least 8 digits long, contain one capital letter,and one digit. Assign the desired user role to the user which was created in the previous step.
Important
Assign the user to exactly one organisation unit. Each mobile reporting client will need their own user name and password.
Detailed configuration of data sets and reporting forms
Though the previous steps is all that should be needed for testing the solution more detail configuration of the datasets may be required and are described in the following sections.
The mapping of data sets to form layout on the phone
By default, a data set is mapped to a single form on the phone. If the data set is divided into sections, each section is displayed as a separate page on the phone. If a data element has more than one category option combo it will be displayed as a heading with the category combination options following.
| Form design element | DHIS2 Metadata | Metadata element |
| Form title | Data set | Short Name if it exists, otherwise Name |
| Page tile | Section | Section name (or form name if no sections) |
| Question | Data element | Alternative name if it exists, otherwise Name |
| Question name if combos | Category option combo | name |
Sorting of forms
By default, data elements will be sorted according to the global sorting assigned in DHIS2. If sections are used, their section specific sorting order will be used. In some cases, when sections are not used, a data element might be used in multiple data sets, and conflict in the way it should be sorted in individual data sets. A work around for this situation is to wrap the whole dataset in one section (note that this will only work if the data elements have the same category option combo)
Versioning of data sets
To make it possible to compare and update the data sets on the mobile phone with the version on the server, data sets are automatically versioned when you edit the data set structure. Some changes which occur on the DHIS2 server, will cause the mobile client to update its forms with a new version.
-
Create DataSet
-
Edit DataSet
-
Create/edit/delete Section in DataSet
-
Sort Section Order
-
Update DataElement (affect many related DataSets)
-
Delete DataElement (affect many related DataSets)
-
Edit DataElement Category
-
Edit DataElement Category Combo
Language support
Multi-language support is available.
DataSet and DataElement are translated through web-based function. Default language on server is used on mobile in cases requested language from mobile is not available.
![]()
Mobile application setup
Installation and initialization
Installation
Download the jar packages from the DHIS2 homepage: https://www.dhis2.org/downloads
Initialization
Initialization should be performed before the phones are delivered end-users. Given the large variation in possible phone configurations, it is impossible to describe the exact steps which are required in order to enable the client on the phone. However, for most phones, simply copying the DHIS2 Web Mobile client "JAR" file to the phone with a USB cable or via Bluetooth is sufficient. Of course, GPRS/3G connectivity must be enabled. Contact your mobile service provider for exact details on the configuration of the phones and networks.

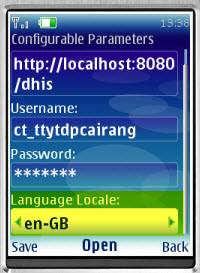
Once the client has been installed on the phone, an initialization process must occur by providing a user name, password and server URL.
-
Logging into the server for the first time.
The first time the client logins to the server, or if the client is reinitialized, the username, password and server URL must be entered.
If the client is unable to login, there could be several possible error messages which you see.
-
Connection Not Found: The specified server URL is not correct. Check the server address, ensure that the server is actually reachable, and try again.
-
Invalid User Name Or Password: the username or password is incorrect
-
Application not authorized to access restricted APIs : The server can be contacted, but the user does not have the necessary permissions to access the mobile reporting module
-
-
Setting the PIN number: After the initial login process, a PIN number can be entered by the user. This will make the login process much easier, as the user only has to remember the four digit pin number, as opposed to typing in the user name and password each time. The PIN number can be preset if the phone is initialized prior to delivery, or it can be set by the users themselves if they have been provided with usernames and passwords.

After entering the PIN, press (Menu)->Next.
-
Download all forms: After the PIN has been specified, all forms will be downloaded from the server and stored locally on the phone..
If the user has been configured to report on aggregate datasets, a list of appropriate datasets will be displayed. If the user is responsible for community based reporting, the list of assigned activities is displayed.
Notes: If the Health Worker is responsible for both Facility Reporting and Community Reporting, DHIS2 server will send all forms of both Facility Reporting and Community Reporting to mobile and on mobile, there will be a screen to choose whether displaying Facility Reporting or Community Reporting.
Errors:
Logging in (for regular use)
After starting the application, the PIN form is displayed.
-
PIN: Enter the four digit number PIN.
-
Reinitialize Command: this function will clear all data on mobile and we start from the login screen with username and password.
-
Errors: Invalid PIN: If the user has entered an invalid PIN, they will need to enter the correct PIN, or reinitialize the application with the correct username and password.
Facility Reporting Module
Entering data
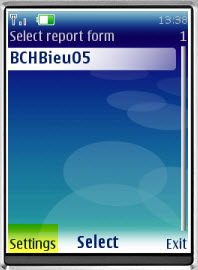
After selecting an aggregate dataset from the "Select report form" window, the user will need to select an appropriate time period. A list of available time periods is automatically generated.
-
After the user has entered their PIN, they can select from a list of available datasets. Select the appropriate dataset and press "Next".

-
Choosing periods: A list of available periods will be automatically displayed to the user. They can select the appropriate period from the list.

-
Fill in values: After choosing the period, the form can be displayed in two modes, depending on the
-
Form with sections
Each form section is displayed in a single screen with the name of the section in the title window.
To navigate from screen to screen, push "Next".
-
Forms without section (Datasets without sections)
All fields are displayed on one screen with the title that is the name of DataSet
The user simply fills in each data element with the appropriate value.

-
-
Save and Complete:
After finishing data entry, the user can choose to save the data locally on the phone or to upload the data directly to the DHIS2 server.

If the user saves the data form, they can edit the form at a later point in time if they need to. When selecting a period once again, the period will be marked as "Saved' as seen in the next screen shot.

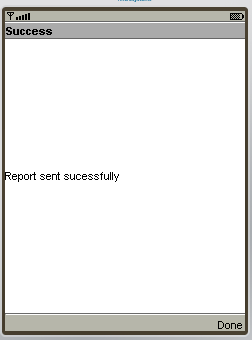
If the user selects "Complete", and the data entry form is not complete, the user will be asked if they are certain they wish to submit the form as incomplete. Once the form has been submitted, a message should be displayed informing the user that the transmission was successful.
Notes
-
Period list:
Periods marked with an asterisk (*) is the period that is completed or saved, depending on the status of the data entry.

All periods that are not in period list are considered old and will be deleted automatically.
-
Storing values duration
The number of saved forms on mobile are limited only by the effective amount of storage of the mobile device.
Forms are saved for limited period only, depending on the frequency of collection of the particular dataset.
-
Daily Forms: 2 months (current and previous month)
-
Weekly Forms: 4 weeks (current and 3 previous week)
-
Monthly Forms: 2 months (current and previous month)
-
Quarterly Forms: 2 quarters (current and previous quarter)
-
Yearly Forms: 2 years (current and previous year)
-
-
Completed forms - Uneditable forms
If the form has been completed, the user can view the form on their phone, but they cannot make any subsequent edits to the form. Each field is greyed out and inactive for editing.
-
Re-Edit completed forms
If the user wishes to edit data which has already been submitted to the server, they can do so by pressing the "Edit" button. They are allowed to do this assuming that the dataset has not been locked for the period in question. If they attempt to upload the data, the user will be informed that the dataset has been locked, and it is not possible to upload the data.

-
Update Forms:
This function is used to synchronize the forms on mobile and on server. The process is automatically triggered after entering PIN number.
Note: Checking and downloading updated forms process run in background. After finished, prompt is displayed to ask user whether refresh form list or stay where they are.
-
Multi-Language Support:
This function help user to choose language of mobile's GUI (graphical user interface) and content's language (Forms).
The forms must be translated on server, otherwise, default language is used.
Default language of first login is English. Change language in Setting menu will affect both interface and content.
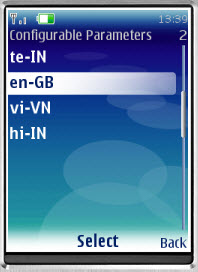
Multi-Language Interface: In Setting menu, there are list of supported language (downloaded from server). Language of GUI is only changed after restart application.
Multi-Language Content (forms): Form's language is change after click "Save". In case there are many forms, it take several minutes to save setting.
Troubleshooting
-
Data has been entered on the phone but does not appear on the server
This usually occurs when users enter data on the phone, but cannot send it to the server. This may be because of the configuration of the phone, lack of credit on the phone, or lack of coverage. Usually an error message is displayed as shown below.
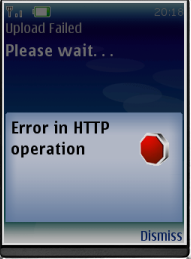
Users should be informed that if they see this error, then it means that their data has not been transmitted.
SMS Command
SMS command feature helps DHIS2 system receiving SMS from users, patients, or even anonymous. A SMS command is an object containing the configurations for each SMS form: reporting data from phones or j2me apps, alerting users, registering patient or user, etc.
Set up SMS command
This is where you can create a new SMS command
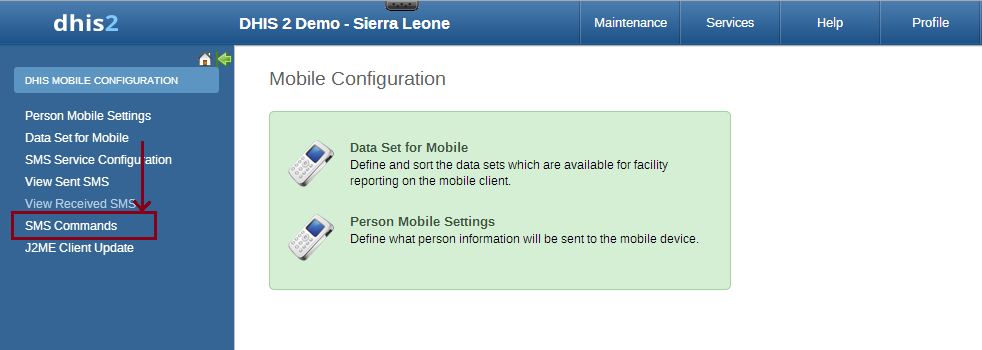
Usually each SMS command has it own property, then the setting up process may be different from each other. Currently, we have 4 types of SMS command:
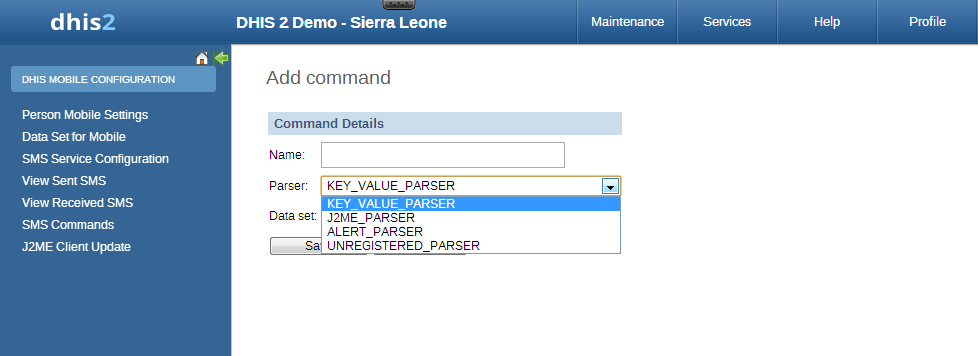
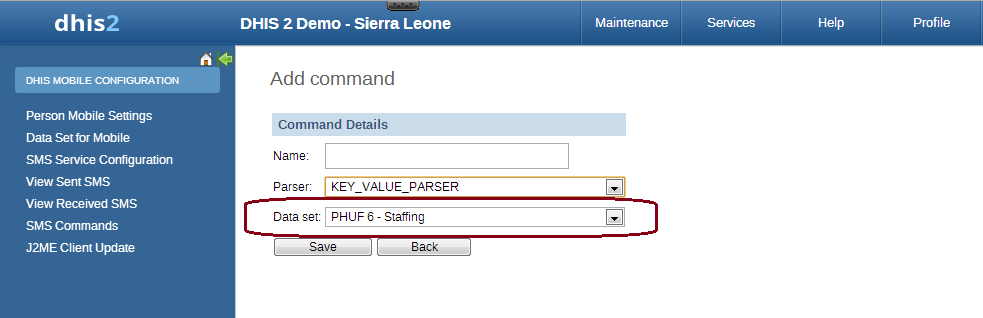
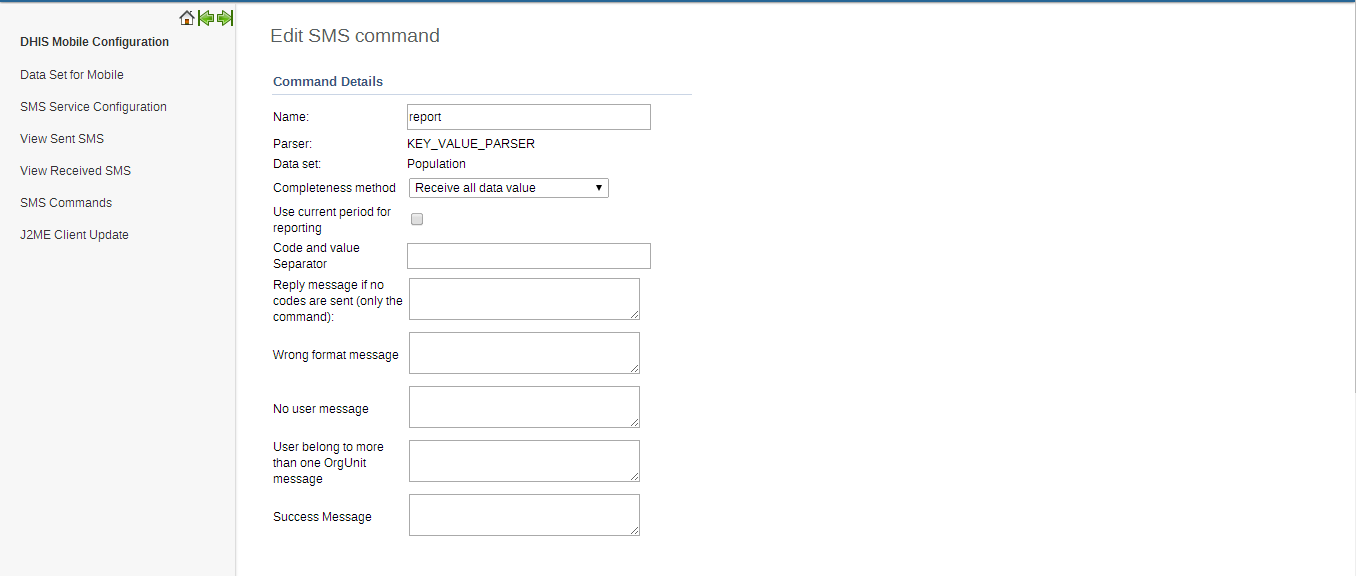
With KEY_VALUE_PARSER and J2ME_PARSER, the SMS command will have dataset because those are used for reporting data. If data is reported for a Period which is already approved then SMS response will be sent back containing information about approval status of the period.
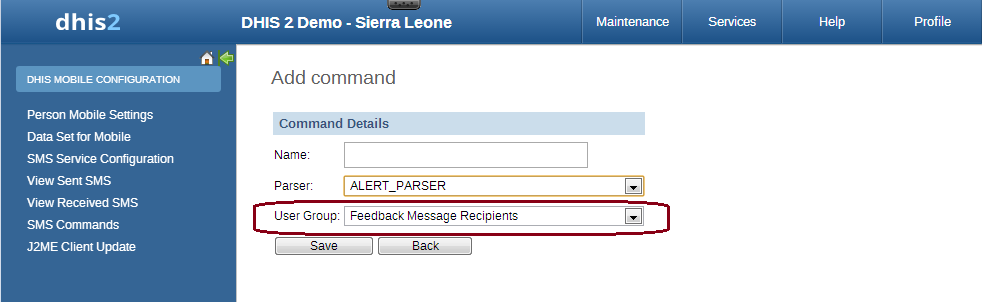
With ALERT_PARSER and UNREGISTERED_PARSER, the SMS command will have user group because those are used for sending message such as SMS, DHIS2 conversation, email.
There are certain parameters which are common to all SMS Command types. These parameters have default values configured in the system, if user does provide any value to these parameters then those default ones will be used. Here is the list of those parameters
Table: Common Parameters
| Parameter | Type | Description |
|---|---|---|
| Code Value Separator | String | To provide custom code value separator. Default is "=" |
| Field Separator | String | To provide custom field separator. Default is "|" |
| Reply message if no codes are sent (only the command) | String | To provide message if no code is found in SMS text input. Default is "Parameter missing" |
| Wrong format message | String | To provide message if command is not formatted correctly. Command should be formatted as per code value separator. This message will also be sent back if any mandatory parameter is missing. |
| No user message | String | To provide message if sending phone number is not registered in DHIS2. |
| User belong to more than one OrgUnit message | String | Certain SMS command types require user ( retrieved from sending phone number ) to be associated with only one organization unit. This message can be configured to be sent back in case that requirement is not fullfilled. |
| Success Message | String | To provide message that will be sent upon successful completion of the process. |
SMS Command Type
The SMS command is basically defined by its parser type. In other word, each SMS command has one unique parser to parse the plain text SMS, then the result will be used for the purpose of that SMS command.
SMS Command for Reporting Data
In order to report data for example data set (aggregation), we use SMS commands which have KEY_VALUE_PARSER (for phone's plain text), or J2ME_PARSER (for j2me apps)
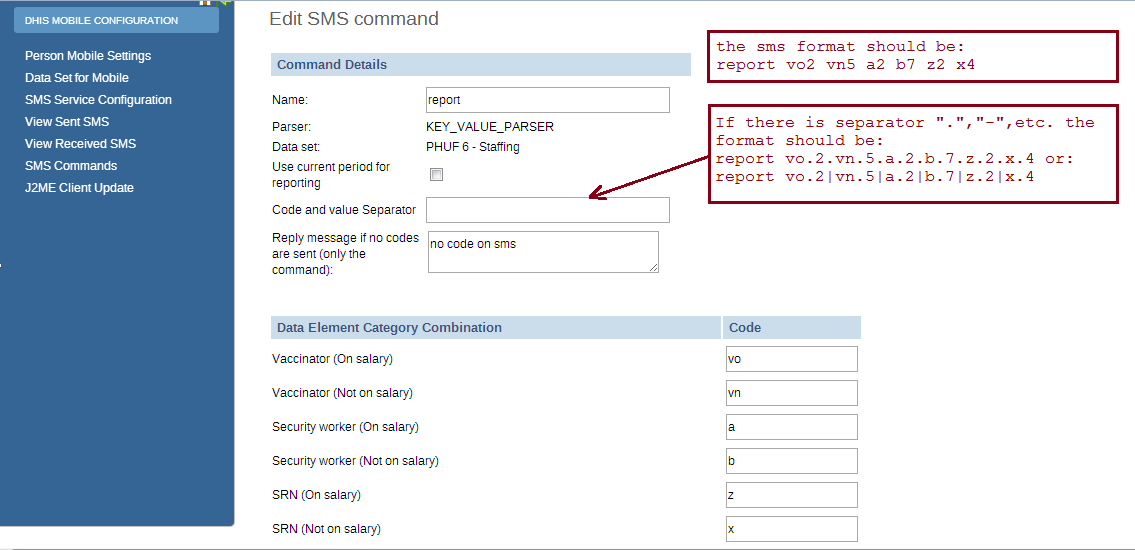
If the command has name "report", and a list of data element with code like above. The format should be: [command's name] [code][value] [code][value] [code][value]....,the [value] of course might be changed depends on real data, so you have to prepare an SMS text like this example: report vo2 vn5 a2 b6 z3 x1
In case the command has a separator for instance ".", the SMS text should be:
report vo.2.vn.5.a.2.b.6.z.3.x.1
or report vo.2|vn.5|a.2|b.6|z.3|x.1
Moreover in SMS text input, orgUnit can be specified like this org orgUnitCode If no orgUnit is specified in SMS then user is retrieved first from the sending phoneNumber and then orgUnit from that user. As far as PeriodType is concerned it should be specified in this format "ddMM" for example 3108, but in case its not specified then PeriodType will be retrieved from DataSet attached to SMSCommand
With the J2ME_PARSER, you don't need to prepare those SMS text, because the J2ME will do this job
User can set the custom response message for "Wrong format message", "No User Message", "User belong to more than one OrgUnit message" and "Success message". If no custom message is being set, system will use the default message.
SMS Command for Entity Enrollment
TRACKED_ENTITY_REGISTRATION_PARSER can be used to enrol tracked entity into the system.
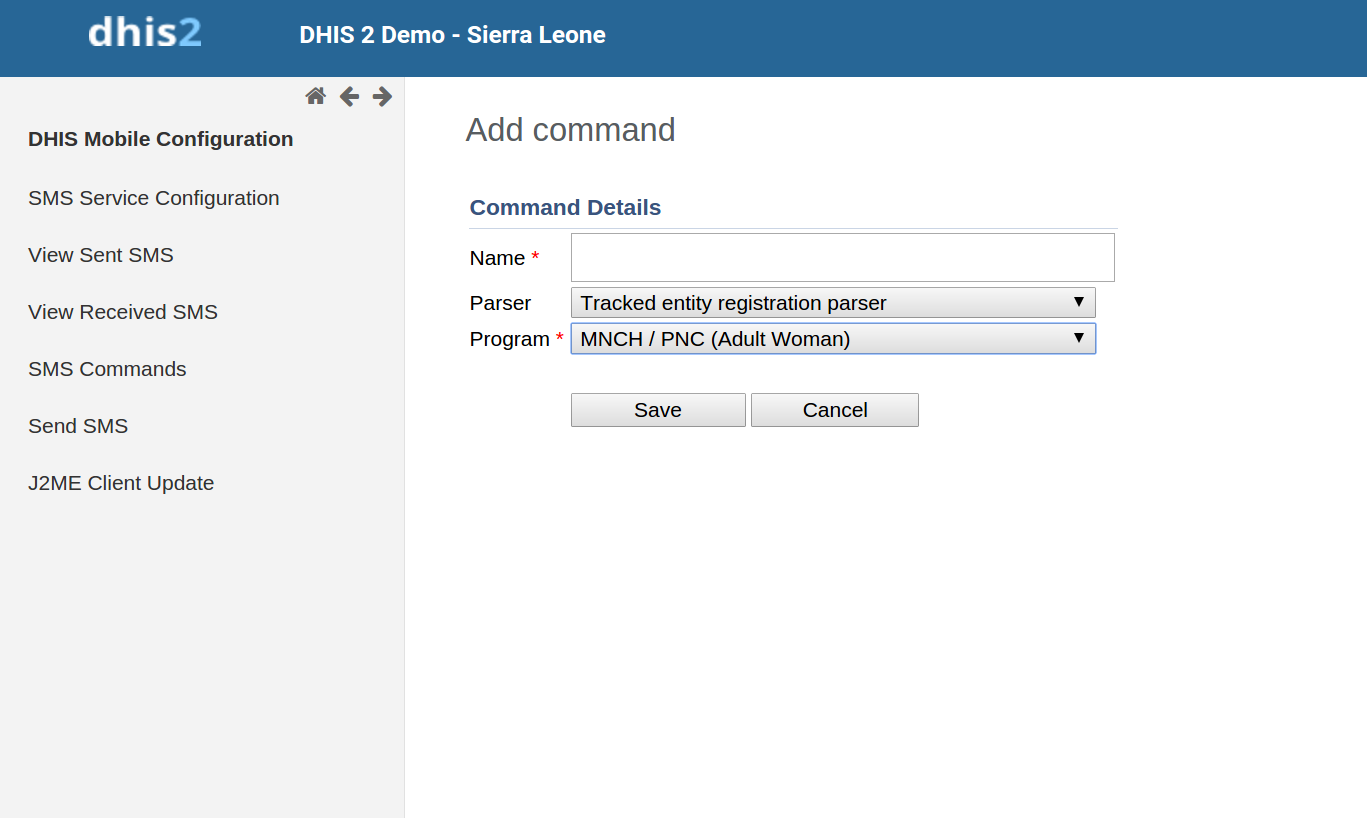
Command name will be followed by tracked entity attributes pertaining to specific program which this command is associated with. Program selection will be done while creating this command.
Default text pattern ( if field separator and codevalue separator is not provided ) for this parser would look like this. childProgram fn=xmen|ln=xmen2|age=4
In case field separator is for example "," then text would look like this.childProgram fn=xmen,ln=xmen2,age=4
Rest of the behavior is same as for other commands. If user does not provide those parameters then default ones will be used.
SMS Command for Program Stage Data Entry
PROGRAM_STAGE_DATAENTRY_PARSER can be used to enter program stage related data for a specific tracked entity instance.

Command name will be followed by data elements pertaining to specific program stage which this command is associated with. Program and program stage selection will be done while creating this command.
Default text pattern ( if field separator and codevalue separator is not provided ) for this parser would look like this. programstage bcgd=1|opvd=2|wght=34
In case field separator is for example "," then text would look like this.programstage bcgd=1,opvd=2,wght=34
Rest of the behavior is same as for other commands. If user does not provide those parameters then default ones will be used.
SMS Command for Alerting, Registering
In order to alert users, we use SMS commands which have ALERT_PARSER (for phone's plain text), or UNREGISTERED_PARSER (for j2me apps). UNREGISTERED_PARSER can also be used for registering IDSR rumour.
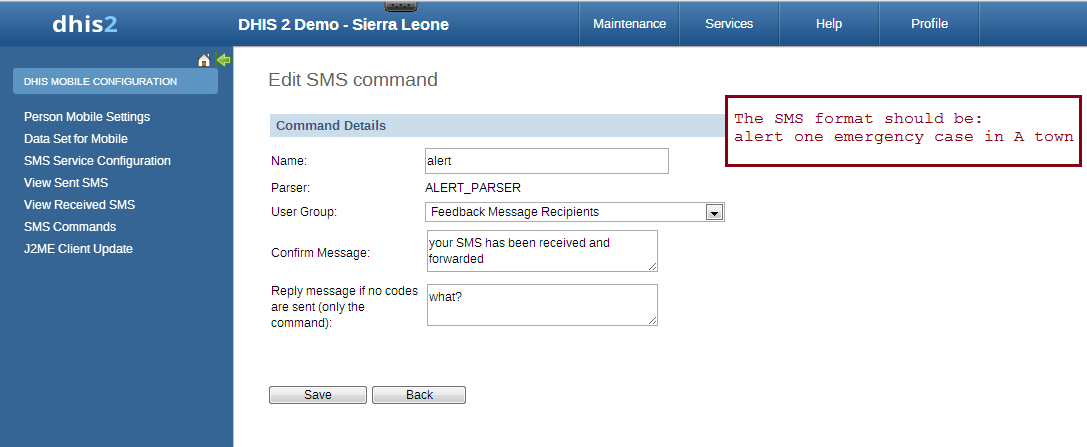
The format of those command will be: [command's name] [text], for example:
alert one emergency case in A town
Commands which has ALERT_PARSER will be received from users only
SMS Command for Event Registration
Event Registration can be used to register anonymous event into the system based on the data collected through SMS. This command type is associated with Programs of type WITHOUT_REGISTRATION. For example Birth events can be tracked using this parser.
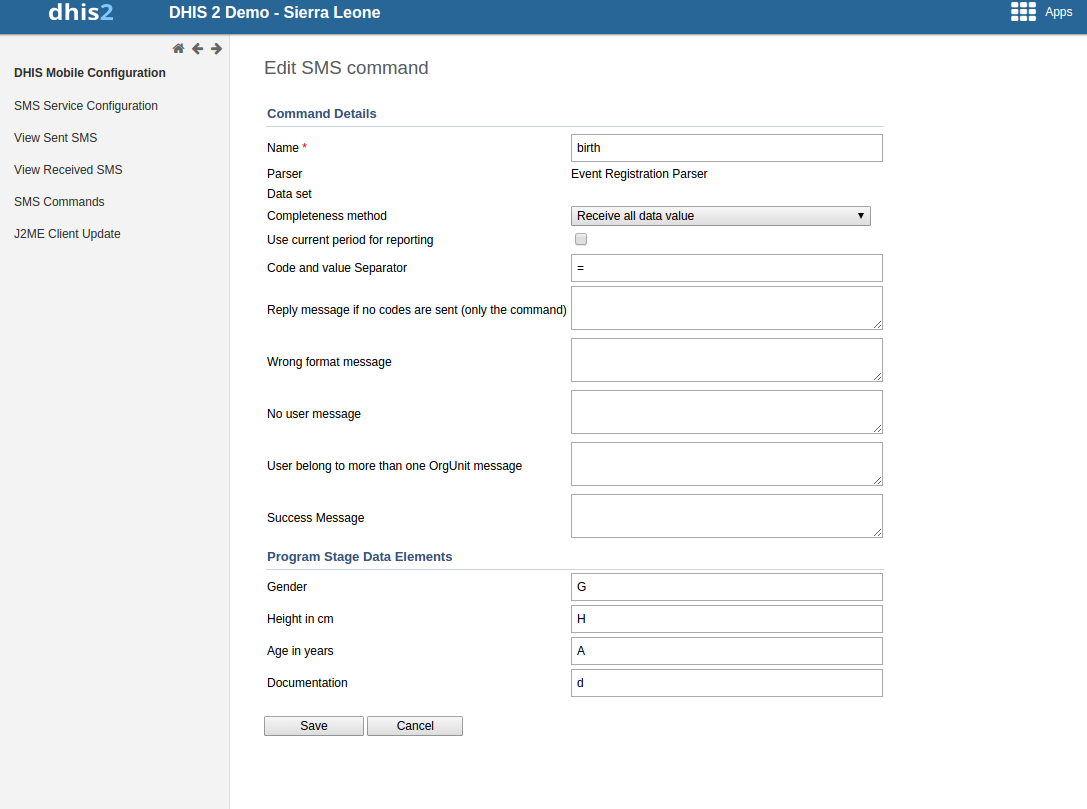
The format of those command will be: [command's name] [code][separator][value], for example:
birth A=1,B=2,G=Male
Code/Value separator is configurable. Pipe "|" is by default taken as field separator. Commands which has EVENT_REGISTRATION_PARSER will be received from DHIS2 users only. Once command is successfully received then data received in SMS will be parsed and event will be registered in DHIS2.
SMS Service
SMS Service is a generic service used for sending/receiving SMS. Any other DHIS2 module can include this service and utilize it to send and receive SMS from users or workers in the field.
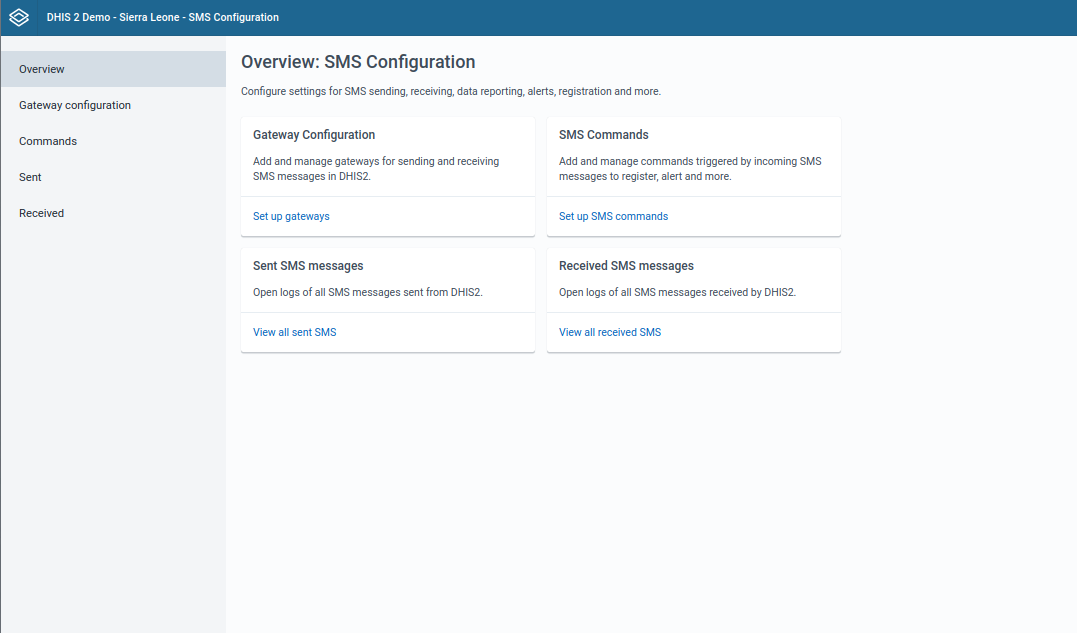
Setting up SMS service
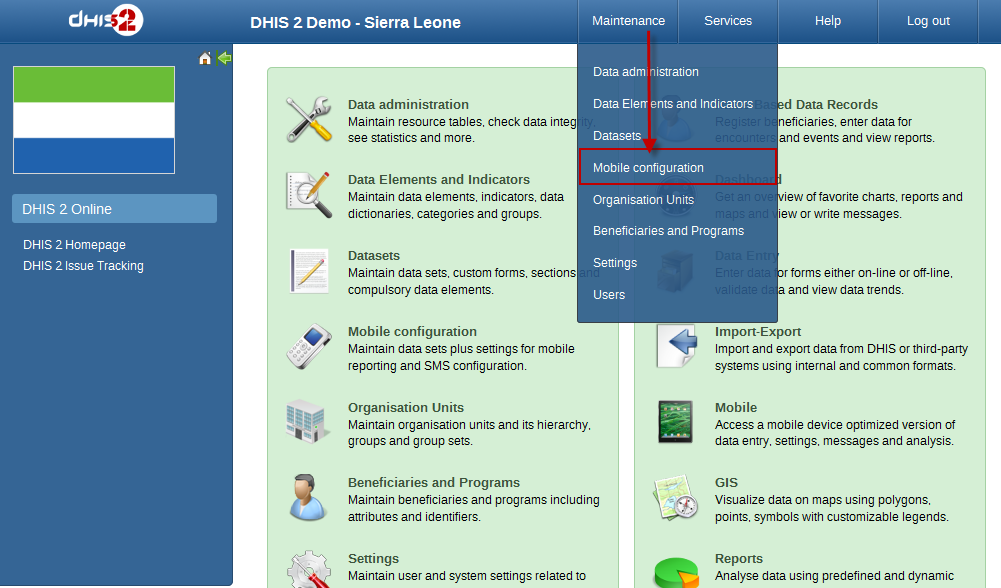
There are few pre-requisites in order to make this service functional. There are two ways to complete these steps. One way is to configure gateway from the GUI in Mobile Configuration Module. The other way is to use SMS Web Api.
- Configure SMS Gateway
Configure SMS Gateway
There are five different types of Gateways supported by SMS Service. SMS can be sent if any one of the gateway is configured. If more than one gateways are present, then they will be used in round-robin fashion for load balancing. There are different parameters for different type of gateway. The Gateway can be configured in GUI in Mobile Configuration Module as shown in the figure. More information about parameters needed to configure gateway can be found in [Gateway Configurations] section of new SMS app.(#gateway.configuration)
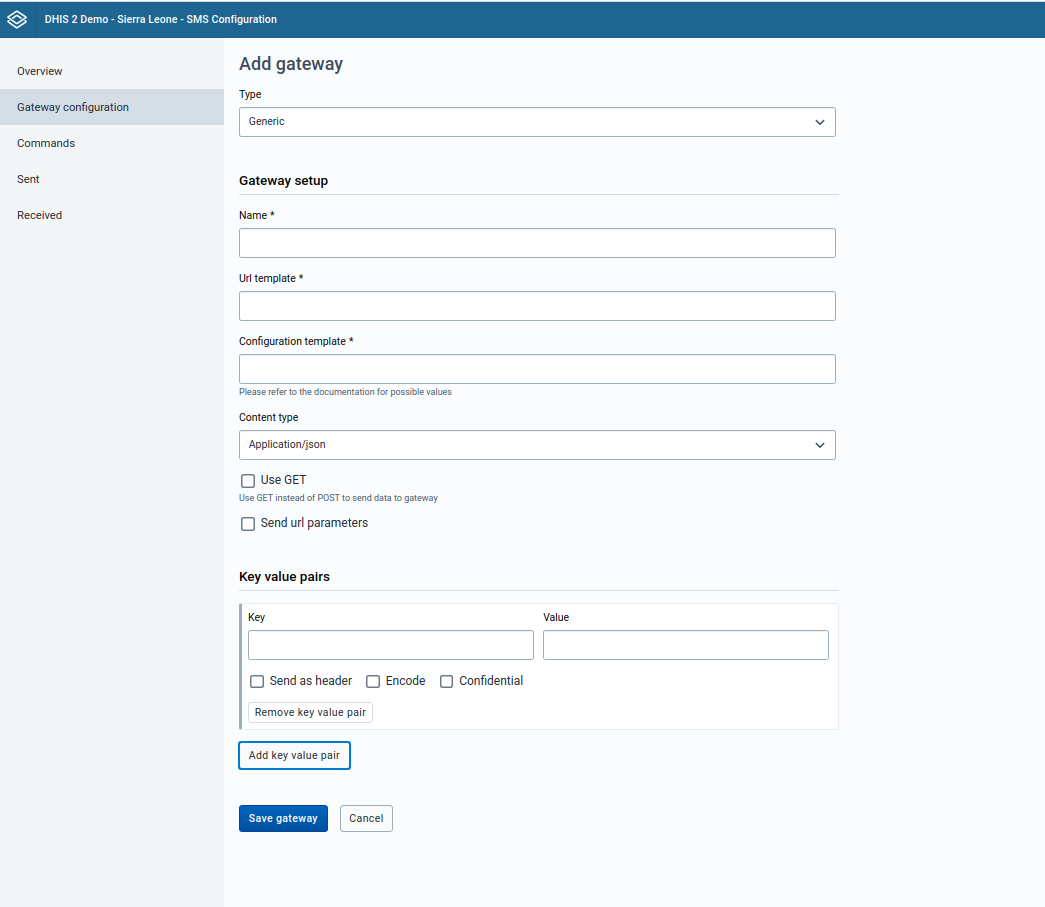
Configure GenericHttp Gateway
Many DHIS2 instances are using GenericHttpGateway to connect to their local gateways. These local gateways provides HTTP APIs for sending SMS. In new GenericHttpGateway it is now possible to configure generic configuration template for gateway configuration. This template is converted into request payload by replacing place holders with actual values taken from gateway key value parameters.
Gateway Configurations
Below table shows the parameters required for configuring gateway.
Table: Gateway Configuration Parameters
| Parameter | BulkSMS Gateway | Clickatell Gateway | Generic HTTP Gateway | SMPP Gateway | Description |
|---|---|---|---|---|---|
| Gateway Name | Optional | Optional | Optional | Optional | Used as gateway identity. Default name will be stored in case this parameter is not configured. Its use is recommended |
| User Name | Required | Optional (if token is used) | Required | Required | Used for API authentication |
| Password | Required | Optional (if token is used) | Required | Required | Used for API authentication |
| Auth-Token | N/A | Optional (if password is used) | N/A | N/A | Used for API authentication |
| URL Template | N/A | N/A | Required | Required | Url Tempalte is only required in case of GenericHttpGateway . For example "http://smsgatewa1.com" |
| Headers | N/A | N/A | Optional | N/A | Header option can be checked to send selected parameter as http header. For example username/password/token can be sent in http header. |
| useGet | N/A | N/A | Optional | N/A | HTTP POST method is used by default for posting data toward gateway. But in certain cases if HTTP GET method is required for doing so then useGet parameter can be set to true. Default value for useGet is false. |
| systemType | N/A | N/A | N/A | Required | SystemType parameter is required for SMPP gateway. Default value is 'cp' |
| typeOfNumber | N/A | N/A | N/A | Required | TypeOfNumber parameter is required for SMPP gateway. Default value is 'UNKNOWN'. Other possible values are UNKNOWN, INTERNATIONAL, NATIONAL, NETWORK_SPECIFIC, SUBSCRIBER_NUMBER, ALPHANUMERIC and ABBREVIATED |
| numberPlanIndicator | N/A | N/A | N/A | Required | NumberPlanIndicator parameter is required for SMPP gateway. Default value is UNKNOWN. Other possible values are UNKNOWN, ISDN, DATA, TELEX, LAND_MOBILE, NATIONAL, PRIVATE, ERMES, INTERNET and WAP |
| bindType | N/A | N/A | N/A | Required | BindType parameter is required for SMPP gateway. Default value is TX. Other possible values are BIND_TX, BIND_RX and BIND_TRX |
| compressed | N/A | N/A | N/A | Optional | Compressed parameter is optional for SMPP gateway. Default value is false |
| sendUrlParameters | N/A | N/A | Optional | N/A | Gateway parameters will be appended with url for example https://samplegateway.com/messages?apiKey={apiKey}&to={recipients},content={text},deliveryreport={dp} |
| contentType | N/A | N/A | Optional | N/A | The type in which data will be sent to sms gateway. Default is application/x-www-form-urlencoded. Other supported types are application/json, application/xml and text/plain |
| configurationTemplate | N/A | N/A | Optional | N/A | Generic configuration template can be used to provide the data in the form acceptable to external gateway. For example username=${username}&password=${password}&to=${recipients}&countrycode=880&message=${text$}&messageid=0. Json/xml template can also be provided. |